Facebook

Saturday, December 29, 2012

Distracting Retractors & the Fall of the Roman Empire


Great title, huh? What do they have in common? More than you might imagine...

I’ve traveled around the world for years teaching clinical photography to dentists, assistants, hygienists and laboratory technicians. I’ve seen dentists use everything from $200 "point and shoots” to $8000 professional setups. I’ve seen old single point and shoot systems all the way to four wireless remotes. Regardless of the system, there’s one mistake that I see over and over again, in the office, that is. (The number one mistake I see outside of the office is dentists deciding to take home their camera, but I’ll cover that another time.)

By far, the biggest mistake I see is dentists being too far away from the patient for virtually every shot. Now, that sounds really easy to fix, right? Wrong. There’s a number of reasons for this problem and it’s not as obvious as you think.

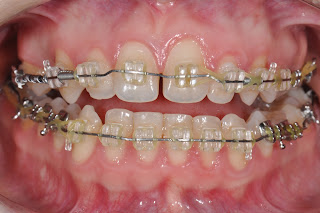
As first gloss you might think it’s as easy as simply getting closer, but that’s not so easy. First, unless you’re a seasoned clinical photographer, it goes against one’s instincts to get in real close. For instance, here’s a typical image of what we want to see in a normal, closed retracted image.


Now, let’s take a look at a typical image that I see when I work with dentists on their photography skills.
Notice the retractors in the picture and the space around the arch in the picture. Like I said earlier, a lot of dentists are just not comfortable getting closer to patients, but if you look at the image, you’ll notice that the retractors are simply not being stretched enough. It all starts with the retractors. If the dentist wasn’t worried about perhaps hurting the patient, the retractors would be stretched further, more of the arch would be visible and they would be able to come in closer to the patient to capture a better image.

So what’s the big deal, you ask? Well, let me ask this: When you show an articulator to a patient, so you have mounting stone all over it, or do you clean it up first?

So, now to the Roman Empire and its failure. Ultimately, it was due to a belief that they were invincible; they could conquer anything and take over the world. Strange things start to happen when you think you’re good enough. Somehow details get missed.  Why show an image with things like distracting retractors it really will send a message to the patient and when you’re trying to do Digital Co-Diagnosis it can make a big difference. They WILL judge you based upon their impression of your attention to detail.

Pay attention to the details, especially when they are as easy as simply pulling a retractor just a bit more. In the long run, it will make all the difference.

If you don’t know how to get exceptional images, quickly and easily, consider purchasing my “Exceptional Clinical Photography Made Easy” DVD by clicking HERE.

Best Wishes,
Glenn

Thursday, December 27, 2012

An easy (and inexpensive) way to get black backgrounds for esthetic dental images


We’ve all been at the dental meetings where the expert esthetic speaker starts showing images with black backgrounds behind the anterior teeth as the crowd “oohs” and “ahhs”. These images look so nice, and I have to admit that they are impressive looking, though they really don;t show you anything that you couldn’t see without the black background.

That said, we all want our images to look as impressive as possible, as long as they meet some basic diagnostic criteria. So, I’ll let you in on a little secret...black backgrounds are REALLY easy to use and shoot, but you do have to master the basics of retractor use first.

Let’s look at a regular anterior image. Nothing fancy. Just a simple anterior retracted image.

clinical photography
Let’s look at a few things about the image, just so we can all be "on the same page” in regard to what we’re looking at. Here’s what matters to me in this image and the critical aspects of how to get them:
- I can see the entire arch going distally (retractor use)
- All teeth (even the posteriors) are in focus (understanding f-stops)
- The cant of the maxillary teeth matches the natural patient presentation (experience)
- The teeth are dry and completely visible (suction use-NOT AIR!!!)
- The lips and cheeks are almost entirely out of the picture (retractor use)

If you can’t master these things, getting nice black background images is going to be tough. Now, for the shameless plug...

If you want to learn how to become a master of retractor (and mirror use), consider buying my “Exceptional Clinical Photography Made Easy” DVD, available at my website by clicking Here. It’s helped hundreds of dentists and gotten rave reviews.

So, once you’ve gotten the basics down, it’s time to look at the esthetic image. Let’s take a peek at one with a black background.

dental photography


Like the other image, let’s dissect it and see what we need to master to get it right every time.

- All teeth are in focus going all the way back (f-stop use)
-  The black background fills in everything without gaps (experience and shape of background)
-  The lighting is perfect (understanding histograms)
-  There are no lips or cheeks in the way (retractor use)
-  The tissue is completely dry (suction AND air)
-  View of soft tissue nearly to vestibule (retractor use)

Here are a few tips:
1. Don’t go buying some fancy black background. For years I’ve used those annoying black dividers that can be found in 3 ring binders. You know the ones...they always get in the way and have zero purpose. They’re made out of black plastic and have three holes punched in them. I take them out, cut them in half and shape two ends like a tongue. They’re about 4 inches long each and I simply place them behind the front teeth before I shoot the image and AFTER I’ve dried the teeth and soft tissue.

2. Use my cut down retractors. When shooting an upper image, there is absolutely no reason to retract the lower lip. I want to get those lips all the way up and out of the way. To see the cut retractors (and the rest of my custom mirrors and retractors) click Here.You MUST pull them laterally and superiorly. Don’t worry, the cut retractors will make it way easier for you without hurting the patient.

3. Practice! Practice! Practice! It takes time to master anything, but you won’t get any better unless you do it all of the time. Just remember that uppers are easy, but lowers do take a long time to master. The tongue makes everything tougher.

Once you start, you can begin using the black background as an addition (NOT A REPLACEMENT) to all of your other great images. Here are a couple of examples.

dental photography


clinical photography tips


If you’re reading this, I’d love some feedback if you feel that my making a video showing the techniques here would be of use. If I get enough people thinking that it is, I’ll do it. Just let me know my making a comment asking for it.

Hoping that you all have an amazing 2013, and remember, you can always get me with questions about anything, including topics you’d like covered at Glenn@Kriegercontinuum.com.