Facebook

Tuesday, December 31, 2013

What Will Some Dentists Do When Point & Shoots Are Extinct?

Well, we’re just hours away from the end of 2013 and we can all agree that it was a pretty interesting year.  In looking back on the year, certain trends were interesting. Like people getting rid of land line home telephones or ditching cable in favor of online streaming. However, there’s one statistic that I saw which may one day play a role in dentistry; the sale rate of "point and shoot" cameras.

AnnaMaria Andriotis, writing for MarketWatch reports that:

"Their small size and sleek look made digital “point and shoot” cameras all the rage for years. Now, demand is sunsetting. Roughly 11.5 million are estimated to have sold this year in the U.S., down 44% from 2012, according to the Consumer Electronics Association, which represents consumer technology companies. Sales are expected to drop to just under 8 million next year.The cameras are suffering from an identity crisis. Consumers who want high-quality photos are opting for the larger, DSLR (digital single-lens reflex) cameras. Others prefer to stick with just one gadget — their smartphone — which takes pictures.And there’s new competition from cameras intended for the outdoor thrill-seeker, like the GoPro, for people who want photos capturing action (the camera attaches to your body while white water rafting or scuba diving, for instance) rather than stopping to pose for a pic.
Down 44% from 2012 to 2013 and down another projected 30% in 2014 is an astounding fact.  That indicates a pretty significant trend.
Virtually every dentist who uses a point and shoot camera for dentistry is simply converting an existing point and shoot camera for dental use. I am aware of no specific camera designed for dentistry alone.
If, as Ms. Andriotis writes, point and shoot camera use is declining as precipitously as the statistics would suggest, will there come a day where point and shoot cameras become extinct? If so, what will be the impact on dentistry?
I’m not saying that there’s an imminent problem looming, but it is interesting how societal trends towards electronics could potentially have an impact in dentistry.
Wishing you all an amazing and prosperous 2014!
Glenn

Saturday, December 14, 2013

An Amazingly Simple Trick To Properly Use The Nikon Macro R1 Flash

So, if you’ve read a lot of my posts on how to purchase a camera and flash, you’ve probably seen that of all the flash systems out there, the one that stands out to me as the easiest and best is the Nikon R1. Now, you may also have seen me write that if you really want to use it with another camera, you can buy the Nikon R1C1 and use the commander module.

If you’ve bought my DVD on learning how to buy and set up a camera system for dentistry (available HERE), one of the only things not on there are the intricacies of how to actually set up the flash systems. Well, in this post, I am going to cover setting up the R1, and in a future post I will cover the Canon MR-14EX.

So, the R1 comes as a myriad of items, but the only ones you really need to be concerned with are the  SX-1 Attachment ring and the (2) SB-R200 speedlights.  Forget everything else. Seriously. Yes, I know you’re probably a dentist and stuck on all the goodies that came with the R1, but forget them. Fight the urge to feel that they are necessary. I have been shooting gorgeous images without everything but the ring adapter that fits your lens. Also, remove the clear lens cover from your speedlight. You won’t need that either.

So, here’s what you’re left with when it’s properly set up (remember, you must have the on board flash popped up for the SB-R200s to function):
R1 flash
R1 Flash with Nikon Camera. NOTE: Only 3 items from the R1 kit are actually used: The SB-R200 speedlights, the  SX-1 attachment for the speedlights and the proper adapter to attach the SC-1 to the threads on your lens.


So, let’s set up the camera first. We need to send a signal from the camera to the flash for it to work. Remember, your camera must support the R1 through a commander mode on your camera’s setup. If it does not (i.e.-the D3100 or D5100) I apologize, but you bought too little camera for dental photography. You CAN convert cameras to work with the R1 but you ned to buy the SU-800 commander module, a $250 upgrade which would have been better spent buy simply spending $250 on a better Nikon which has commander module built in. If you made that mistake, don’t beat yourself up. It’s very common.  You just need to figure out if you want to add the $250 attachment or buy a different camera. It’s up to you, but I’d buy a better camera so that things would not be so bulky and the picture quality will be better.So, let’s go into the menu on the back of the camera and navigate through to the final picture by following the yellow highlighted options. Almost all Nikons have this feature. They may look slightly different as you navigate, but they are very similar. Here’s a great image from Nikonians.com:
Most Nikons have similar menu options, so getting to the “Built-in Flash Mode” should be pretty easy to find.


You simply need to get to that final  “Built-in Flash Mode” menu screen and we’re almost there.So, once you see that screen, you simply need to use the toggle button (shown in yellow below) 

on the back of your Nikon to toggle between the “Mode” and “Comp.” columns and to make the following settings:
Set the Built in to “--“ which means you’ll be turing off the built in flash. Remember, you still need to pop it up for the speedlights to work because it will emit a brief “pre-flash”.
Set the “Group A” to Mode “M” and Comp. “1/1”-this will be full power
Set the “Group B” to Mode “M” and Comp. “1/4”-this will be 1/4 power
Set the “Channel” to “1” 
Save your settings.

Now, look at the top of your SB-R200 speedlight. It should look like this:


Remember that you set the channel to 1? Well, ALWAYS make sure that your channel here is set to”1" or the camera and flash will not communicate. If your flash ever doesn’t properly fire in the future, look at that first (after making sure you’re on-board flash is up).

Remember that you set the “Group A” to 1/1 and the “Group B” to 1/4? That’s because whenever you want to shoot a full face image and need full flash, simply set it to “A” on the flash (on both speedlights). When you shoot intra-orally, you want a considerably diminished flash power, so simply set both to “B”. It is truly that simple. To toggle between intra and extra oral images, you simply need to turn a switch from “A” to “B”. Yep, that’s it. Well, not really.  

Of course, you need to know how to handle f-stops and lighting for properly lit images as well as great depth of field and you also need to know how to handle mirrors and retractors for proper composition but those are covered in great detail in my DVDs found HERE.

I hope this helped and as always, please hit me with any questions.

Best Wishes,
Glenn

Sunday, July 21, 2013

Do You Use a Ring Flash or a Point Flash for Dental Photography?

The title of this post is a question that I must have asked at least a hundred times a year at lectures when someone asked me about their camera setup. I'd have to guess that they didn't know the answer or were wrong at least 75% of the time. Well, I'm going to help you understand which one you have and why it's really important to know.

Let's start with point flashes. As their name implies, they shed a point of light, from an angle to the subject. The great thing about point flashes is that they give shadows. Think of walking down the street near sunset. The shadows are nice and long.

dental images
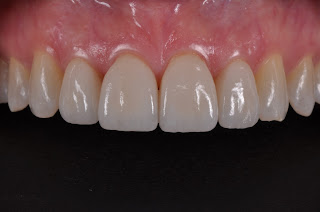
Shadows are what distinguish decent from awesome dental images.
That's what we kind of want in dental images We want nice shadows to show negative space where it actually exists. I'm not talking about the shadow cast by the cheek when it's not properly retracted, but rather the shadow cast into embrasures, for instance. It's shadows that allow us to properly see stippling on gingiva or the texture of oral pathology or the surface texture on a tooth as it bounces off of the subject.
dental camera
Negative spaces between teeth and on surfaces really allow one to see surface texture
This shadowing is where point flashes truly excel. Ring flashes throw light from every angle and wash out the color and hide the details for precise lab work or beautiful, natural color.

Traditionally, point flashes were single in number and cast shadows in only one direction. However, a couple of decades ago, someone got the great idea to place the flash on both sides of the lens and the quality of images jumped through the roof. Nowadays, wireless flash systems like the one from Nikon allow photographers to put as many flashes as they like around the lens. I often see dentists with upwards of 4 point flashes around a lens and for pure shooting purposes, they have turned a point flash into a ring flash. For the record, I've gotten some gorgeous images with just 2 flashes and don't see the need for anything more.

The Nikon R1 (or R1C1) is a simple example of dual point flash use. You'd almost have to be blind to confuse it with a ring flash. This is my favorite flash for dentistry because it throws nice long shadows due to its distance from the lens.
Dental photography
The Nikon R1 is an amazing flash which gives great surface texture


The Canon MT24-EX is also pretty easy to distinguish as a dual point flash , however, it's high cost and super bright lights make it a less than ideal flash for most dentists.
Dental photography
The Canon MT-24EX is an amazing flash but very expensive and needs an experienced user to control

So, what about the most common flash, the Canon MT14-EX? Almost every doctor I've met who uses it calls it a ring flash, but it isn't. It's a dual point flash because each side can be independently turned on or off and this is REALLY important (as I will get to soon). It's a great flash...if you know how to use it properly, and very few do.
Dental photography
Most owners of the Canon MT-14EX don't know if it's a ring flash or double point flash

The Metz 1510 is a pure ring flash. I am not at all a fan of it for many reasons, and you can email me if you want to know more.

dental camera
Don't be lured by the wireless nature of the Metz flash. For the money, there are WAY better options


Here's the key fact. If you want to get great images of your patients to hang on the wall, get great depth of field or communicate with labs or other dentists, you had better know how to use your flash properly.

To learn more about our clinical photography DVD series which will get you shooting the best dental images imaginable, simply click HERE.

Best Wishes,
Glenn

Thursday, July 4, 2013

An Amazing Website to Compare Dental Cameras

As I mentioned in my last post, one of the most common questions I get is: "Which camera should I buy?" Though there are significant differences between using a digital camera for dental and recreational use, there is an amazing website for learning more about each camera body out there as well as side by side comparisons for almost all camera competitors in each price range.

The website to which I am referring is Snapsort.com and it is DEFINITELY worth checking out.

Are you looking to see if the newest features of a camera make it worth switching? This website is for you.

Here's how it works:

Enter the camera body you're looking the learn more about. In this case, let's enter the Nikon D7000. It will show you all of the features, cost, etc.

dental photography
Once you enter a camera, you'll get many options to evaluate. Everything from a basic overview to lowest priced places to buy it. 


Not impressed yet? That's OK. You can click on the "competitors" link and it will give you the opportunity to compare other cameras in the similar price range and with similar features---even by different manufacturers. Don't worry, though. You do not need to guess which cameras are competitors; the site automatically shows them to you for your choice. In some cases, there can be a dozen or so.
dental photography
When you choose "competitors" you will get an auto generated list of other cameras in the same price and feature range---from other camera manufacturers as well.


When you click on the "Compare" link to the right of the competitor, it will then bring you to a "summary" page where the overall results of the comparison are displayed.


dental camera
The compare feature is amazing.

I'm always on the lookout for resources to help those who trust my opinion and I think that this is a great place to get some really nice cursory information about camera bodies. Oh, and by the way, I have NO financial interest in Snapsort.

Of course, once you get a camera body, you need a lens and flash system specifically designed for up-close "macro" photography. I would strongly suggest our 2 DVD series which will help you choose and set up a camera for perfect lighting, depth of field and composition. Use the information on these 2 DVDs and you'll have others jealous when they look at your images. They can be seen HERE .

As always, best wishes.

Glenn

Friday, June 28, 2013

Which dental camera should I buy?

I love to write about ways to help dentists get better images. I discuss things like composition, mirror and retractor position, how to get images without a second operator, getting great depth of field, how to never worry about lighting and a whole host of other things to help dentists get the absolute best images in their community. However, no matter where I go, or who I teach, almost every dentist, assistant or hygienist who approaches me starts with "Which camera should I buy?"

It's a curious question, but one with which I am not surprised. You see, dental professionals are techies, or most are, at least. We love to look through our dental journals and learn about the latest and greatest products and see the new bells and whistles that will make the delivery of care easier and more efficient. Naturally, it would follow that when it comes to cameras, the equipment we choose will make all the difference, right? Well, not really.

I know that right now it's not in vogue to quote Lance Armstrong, but I've long quoted the title of his book "It's not about the bike." When it comes to getting amazing dental images, it's simply not about the camera. Sure, the equipment you use will play a role in your images, to a point, but I have been at dental meetings where I grabbed a point and shoot, took a couple of images and challenged anyone in the room to match my composition and lighting.

Here's a secret you probably already know: The key to exceptional dental images is NOT the camera setup you buy,  but rather, the way you use it. If you have exceptional ability at using mirrors and retractors, you can use virtually any camera and get great images. If you know what a histogram is and how to use f-stops for amazing depth of field, you could use any SLR camera for perfect shots every time regardless of camera brand.

So, the next time you're wondering if you have the right camera setup, feel free to email me at Glenn@Kriegercontinuum.com and ask. Whether it's a 10 year old Fuji S2 or a brand new Nikon D7000, recognize that both of these cameras can give you great images. However, as I tell most who e-mail me, be less worried about your setup and more worried about your skills. Instead of looking to invest in a new camera, consider my 2 clinical photography DVDs and shoot amazing images regardless of your SLR camera setup.

Click HERE to see our DVDs.

Best Wishes,
Glenn

Monday, April 15, 2013

5 Tips To Capture Amazing Images

Our 3rd webinar in our series "Getting Started With Clinical Photography" has now been posted on our website. You can see it by clicking HERE.

Thanks to everyone who came and listed to our webinars. For those of you in different time zones, don't worry. We're going to give them again next month at times specifically for you.

If you have an ideas for future presentations or if there's anything you'd like to see, please let us know.

Best Wishes,
Glenn

Wednesday, April 10, 2013

Webinar Now Posted- 5 Ways to Use Your Dental Camera System for Maximum Efficiency

Our 2nd webinar in the "Getting Started With Clinical Photography" series was a huge success tonight. Thanks to all 84 people who signed up.

If you want to see it (again) is is available HERE.

If you want to sign up for our 3rd, and final webinar in this particular series, you can do so by clicking HERE.

Best Wishes,
Glenn

Tuesday, April 2, 2013

Archived webinar now available-Sign up for the next one!

Hi Everybody.

I wanted to thank the 83 people who signed up for my webinar "8 Tips for Buying the Right Clinical Camera System" earlier this evening. It was the first in a three part series of 15 minute webinars called "Getting Started With Clinical Photography".

We've gotten a lot of requests for people who missed it, so we've archived it on our website. You can find it by clicking HERE.

Our second part in the series, "5 Ways to Use Your Dental Camera System for Maximum Efficiency" will be held next Wednesday evening at 7:30 PM EST. You can register for free by clicking HERE.

Best Wishes,
Glenn

Saturday, March 30, 2013

8 Tips For Buying the Right Camera System For Clinical Dental Photography

Hi All!

I've decided to put on a 3 part webinar series on implementing clinical photography in the dental practice. I know how busy you are, so I always keep them to less than 20 minutes and I leave time for questions afterwards.

Join me this Tuesday evening at 7:30 EST as I present the first one "8 Tips For Buying a Clinical Dental Photography System".

Click Here to be directed to the registration page and please feel free to tell your friends and team members.

Best Wishes,
Glenn

Sunday, February 17, 2013

Assistants and Clinical Dental Photography

"Whatever you are, be a good one." —Abraham Lincoln

This is a short post, but one that I think is one of the most important I have ever posted.

As I travel around talking about clinical photography inevitably the conversation turns to the one big statement..."My staff doesn't want to use a big and bulky SLR camera" to which I always respond "To flippin bad for them". 

Sure an SLR is slightly heavier. I've done the math (yep, I'm a geek). The Nikon D3200 with an 85mm Nikkor lens and R1 flash weighs roughly 1075 grams. That's just over 2 1/2 pounds. I've seen many an out of shape team member carry a Costco birthday cake weighing 10 pounds with a smile on their face, so don't let tell me that a camera is too much trouble.

C'mon everybody...You went through college and persevered through dental school. May of you even went on to specialty programs. The fact that you even care enough about clinical photography to read my blog tells me that you are all the "creme de la creme" of dentistry. Hopefully, you have written mission and vision statements which you created with your amazing teams. If one of your goals is to excel at what you do, how can your team refuse to use a simple device (the SLR) which will give amazing images, increase case acceptance and make your practice stand out that much more in the community?!?!? Better yet, how can you let the get away with that?!?!?

Great teams follow great leaders. Make it a point that you have all worked so hard to get to where you are. There are shortcuts you can take and those you can't. Once you learn how to use an SLR, you will NEVER go back. It's like anything else with an adaptation period. Insist they use it for a while and your team will start to take great pride in the images they take, but like a diet, or workout commitment, the first three weeks are tough (read "Psycho Cybernetics by Maltz" for more). Once through the first 21 days, though, a transformation will happen and your team will be on board. 

Do I seem a little unyielding on this topic? Darn tootin'! Our names are on the building and we signed big notes to buy our practices. I try to be very fair with my team but I get what I want. However,  I would never ask any member to do anything that I wouldn't be willing to do, and I've personally shot an SLR for 20 years. 

If you ever have a team member who isn't willing to use an SLR with a smile on his/her face simply because you asked them, explain to them why you want them to do it and the importance in making your practice the best. If they're still not willing or they're complaining, well, it's up to you where you go next...

Go get great images and make your practice the best it can be and don't let an unhappy team member hold you back from being the best you can be. 

You can let them make excuses or you can get results. You choose the one that you want.

Best Wishes,
Glenn


Tuesday, January 8, 2013

Wireless Images for Clinical Photography-send to an iPod, phone or computer

I’ve been asked over the last several years if there is any good way to send images to mobile devices such as tablets or phones. With the popularity of iPad and Android tablets, many doctors want to start sharing images immediately with patients.

Though there are many good and bad reasons to warrant carefully deciding if that’s really a good idea, there are now many options for dentistry. I’ve looked at a bunch of different ways, and here is some feedback.

There are some really expensive ways (not what I want to do) and some really inexpensive ways to do it. Problem is, the ones that work with all cameras (expensive modules like the Nikon WT 5A) either cost too much or  aren’t practical and the ones that are inexpensive and work well (Nikon WU-1A) don’t work well for all cameras unless hacked.

The reviews on the Nikon WU-1A have been great, and for less than $50, its a great option-if you happen to use a Nikon D3200. If you use any other type of Nikon, well, you’re out of luck. Remember, it only sends you images to a tablet or phone, which is great ti show a patient, but is otherwise a pain to work with and store.


The Eye-Fi Pro X2 ($99)  is the best option for now, because it fits in every camera, will wirelessly transfer to your computer, tablet or phone quickly and easily. Simply hook up to your office (or home) network, designate the fie to which you want to send it and you’re set. Use the file on your computer the same way you might use a “holding” folder, then transfer them to the desired folder later. It’s a great way to work.


Before you go ahead and take the plunge, give a little thought about the logistics of how you plan on using this technology. How will you store images and if you want patients to sees it on an iPad or other tablet? Think of it in terms of a bigger system. Just remember the words of Steve Jobs...

"Innovation distinguishes between a leader and a follower.”

If you want to learn how to get the best clinical images, or you want a resource for your team, consider using our acclaimed DVD available HERE .

Best wishes for an awesome 2013!!!

Glenn