So, if you’ve read a lot of my posts on how to purchase a camera and flash, you’ve probably seen that of all the flash systems out there, the one that stands out to me as the easiest and best is the Nikon R1. Now, you may also have seen me write that if you really want to use it with another camera, you can buy the Nikon R1C1 and use the commander module.
If you’ve bought my DVD on learning how to buy and set up a camera system for dentistry (available
HERE), one of the only things not on there are the intricacies of how to actually set up the flash systems. Well, in this post, I am going to cover setting up the R1, and in a future post I will cover the Canon MR-14EX.
So, the R1 comes as a myriad of items, but the only ones you really need to be concerned with are the SX-1 Attachment ring and the (2) SB-R200 speedlights. Forget everything else. Seriously. Yes, I know you’re probably a dentist and stuck on all the goodies that came with the R1, but forget them. Fight the urge to feel that they are necessary. I have been shooting gorgeous images without everything but the ring adapter that fits your lens. Also, remove the clear lens cover from your speedlight. You won’t need that either.
So, here’s what you’re left with when it’s properly set up (remember, you must have the on board flash popped up for the SB-R200s to function):
 |
| R1 Flash with Nikon Camera. NOTE: Only 3 items from the R1 kit are actually used: The SB-R200 speedlights, the SX-1 attachment for the speedlights and the proper adapter to attach the SC-1 to the threads on your lens. |
So, let’s set up the camera first. We need to send a signal from the camera to the flash for it to work. Remember, your camera must support the R1 through a commander mode on your camera’s setup. If it does not (i.e.-the D3100 or D5100) I apologize, but you bought too little camera for dental photography. You CAN convert cameras to work with the R1 but you ned to buy the SU-800 commander module, a $250 upgrade which would have been better spent buy simply spending $250 on a better Nikon which has commander module built in. If you made that mistake, don’t beat yourself up. It’s very common. You just need to figure out if you want to add the $250 attachment or buy a different camera. It’s up to you, but I’d buy a better camera so that things would not be so bulky and the picture quality will be better.So, let’s go into the menu on the back of the camera and navigate through to the final picture by following the yellow highlighted options. Almost all Nikons have this feature. They may look slightly different as you navigate, but they are very similar. Here’s a great image from Nikonians.com:
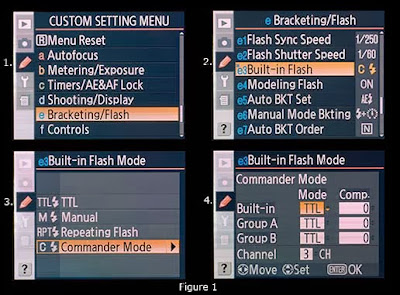 |
| Most Nikons have similar menu options, so getting to the “Built-in Flash Mode” should be pretty easy to find. |
You simply need to get to that final “Built-in Flash Mode” menu screen and we’re almost there.So, once you see that screen, you simply need to use the toggle button (shown in yellow below) 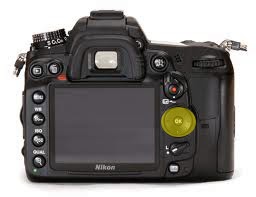
on the back of your Nikon to toggle between the “Mode” and “Comp.” columns and to make the following settings:
Set the Built in to “--“ which means you’ll be turing off the built in flash. Remember, you still need to pop it up for the speedlights to work because it will emit a brief “pre-flash”.
Set the “Group A” to Mode “M” and Comp. “1/1”-this will be full power
Set the “Group B” to Mode “M” and Comp. “1/4”-this will be 1/4 power
Set the “Channel” to “1”
Save your settings.
Now, look at the top of your SB-R200 speedlight. It should look like this:
Remember that you set the channel to 1? Well, ALWAYS make sure that your channel here is set to”1" or the camera and flash will not communicate. If your flash ever doesn’t properly fire in the future, look at that first (after making sure you’re on-board flash is up).
Remember that you set the “Group A” to 1/1 and the “Group B” to 1/4? That’s because whenever you want to shoot a full face image and need full flash, simply set it to “A” on the flash (on both speedlights). When you shoot intra-orally, you want a considerably diminished flash power, so simply set both to “B”. It is truly that simple. To toggle between intra and extra oral images, you simply need to turn a switch from “A” to “B”. Yep, that’s it. Well, not really.
Of course, you need to know how to handle f-stops and lighting for properly lit images as well as great depth of field and you also need to know how to handle mirrors and retractors for proper composition but those are covered in great detail in my DVDs found
HERE.
I hope this helped and as always, please hit me with any questions.
Best Wishes,
Glenn


