That said, we all want our images to look as impressive as possible, as long as they meet some basic diagnostic criteria. So, I’ll let you in on a little secret...black backgrounds are REALLY easy to use and shoot, but you do have to master the basics of retractor use first.
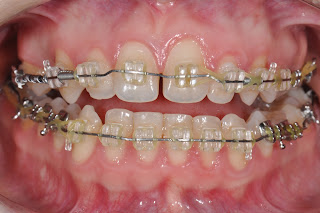
Let’s look at a regular anterior image. Nothing fancy. Just a simple anterior retracted image.
Let’s look at a few things about the image, just so we can all be "on the same page” in regard to what we’re looking at. Here’s what matters to me in this image and the critical aspects of how to get them:
- I can see the entire arch going distally (retractor use)
- All teeth (even the posteriors) are in focus (understanding f-stops)
- The cant of the maxillary teeth matches the natural patient presentation (experience)
- The teeth are dry and completely visible (suction use-NOT AIR!!!)
- The lips and cheeks are almost entirely out of the picture (retractor use)
If you can’t master these things, getting nice black background images is going to be tough. Now, for the shameless plug...
If you want to learn how to become a master of retractor (and mirror use), consider buying my “Exceptional Clinical Photography Made Easy” DVD, available at my website by clicking Here. It’s helped hundreds of dentists and gotten rave reviews.
So, once you’ve gotten the basics down, it’s time to look at the esthetic image. Let’s take a peek at one with a black background.
Like the other image, let’s dissect it and see what we need to master to get it right every time.
- All teeth are in focus going all the way back (f-stop use)
- The black background fills in everything without gaps (experience and shape of background)
- The lighting is perfect (understanding histograms)
- There are no lips or cheeks in the way (retractor use)
- The tissue is completely dry (suction AND air)
- View of soft tissue nearly to vestibule (retractor use)
Here are a few tips:
1. Don’t go buying some fancy black background. For years I’ve used those annoying black dividers that can be found in 3 ring binders. You know the ones...they always get in the way and have zero purpose. They’re made out of black plastic and have three holes punched in them. I take them out, cut them in half and shape two ends like a tongue. They’re about 4 inches long each and I simply place them behind the front teeth before I shoot the image and AFTER I’ve dried the teeth and soft tissue.
2. Use my cut down retractors. When shooting an upper image, there is absolutely no reason to retract the lower lip. I want to get those lips all the way up and out of the way. To see the cut retractors (and the rest of my custom mirrors and retractors) click Here.You MUST pull them laterally and superiorly. Don’t worry, the cut retractors will make it way easier for you without hurting the patient.
3. Practice! Practice! Practice! It takes time to master anything, but you won’t get any better unless you do it all of the time. Just remember that uppers are easy, but lowers do take a long time to master. The tongue makes everything tougher.
Once you start, you can begin using the black background as an addition (NOT A REPLACEMENT) to all of your other great images. Here are a couple of examples.
If you’re reading this, I’d love some feedback if you feel that my making a video showing the techniques here would be of use. If I get enough people thinking that it is, I’ll do it. Just let me know my making a comment asking for it.
Hoping that you all have an amazing 2013, and remember, you can always get me with questions about anything, including topics you’d like covered at Glenn@Kriegercontinuum.com.


We are all aware that the services rendered by a dentist is extremely crucial in our lives, and for this reason, seeing them regularly is suggested. They are the experts who are going to help us ensure that are smile is perfect and that our teeth is perfect as well. it is great post.
ReplyDeleteQuincy Dentist
Thanks Arvenda. I'll keep posting if you keep reading.
ReplyDeleteBest Wishes.
What camera settings do you use for the images with a black background? Are they any different to your normal settings? My teeth tend to look washed out and too white when using the black background.
ReplyDeleteThanks JF
I actually use the same camera settings as usual. If you're shooting aperture priority and varying your flash and f-stops, it should be simple. If it isn't there's something wrong. If you're not using this techniques, you have to start. I outline all the basics on my DVD available at www.KriegerContinuum.com .
DeleteBest Wishes,
Glenn
I suspect you are using a f stop of 22 or greater and focusing on the cervical areas so the flash falls off quickly ninth the central mouth area.
ReplyDeleteYes. Even with a flash setting of 1/4 or 1/8 , you are so close to the teeth that you must use a reasonably high f-stop. However, lighting with the current systems is very consistent and looks great.
Delete