Facebook

Sunday, April 15, 2012

iDVD as the Best Dental Marketing Tool Ever!!!

Like many dentists, I was a "PC Guy" for years. After all, my office software ran on a PC and it's just the way I was brought up. Then, one day at the mall about 5 years ago, I was walking past the Apple store and decided to stop in. I looked around and decided that I would try an experiment. I bought a cheap, bottom of the line Mac Mini and installed a virtual environment using VMWare ( I can explain this more to you if you're interested) and Windows XP. On that computer I installed the PC dental software so I could see how it could perform.

Well, it worked pretty well, with most of the shortcomings being due to the low computing power of the mini, not the overall nature of the Mac. However, having the mini allowed me to spend a lot of time playing with Mac apps. My favorite quickly became iDVD.

iDVD is ("was"-more on this below) an amazing piece of software that was originally designed to allow you to burn your movies to DVD, however, it was really very useful for marketing your practice. Imagine being able to make a professional movie that could play in your office, showing all of your cases with navigation using nothing more than a remote control.

iDVD allows one to create "chapters" of slideshows that one can see on the home screen. Like any DVD, what you burn allows a repeatable home screen like you might see on any commercial movie DVD. While this screen plays over and over, there are a variety of slideshows of your work that you can setup for one to choose. Best of all, when the shows start, music can play with them and the program will take the song you choose and make the number slides fit it perfectly. It's amazing!

Best of all, once it's burned to disk, all you need to show it is a TV with a  DVD built in. Right now, you could buy a 32" flatscreen TV with a built in DVD player for as little as $279. You can make a DVD in as little as 10 minutes and have a great way of showing off your work to everyone who comes into your office.

Below is an example of what you could make. Your patients could use the DVD remote control to pick which slideshow they want to see.

Here is an example of what the finished "Home Page" will look like while it plays on your computer in the reception area or consultation room.


All your viewer would need to do is pick which of the slideshows they would like to see.  What this blog cannot show you is how nice the screen looks on a TV. The box with the smile circles around and you can pick several picture to cycle. It also has music.

Now, imagine that for your finished cases you made a DVD to send to a patient's workplace along with a mug with your practice name and some mints/candies in it. The DVD could look something like this:

This is what a DVD to be sent to a patient can look like.

If you put nice pictures on the show, there's a pretty good chance that they'll throw it in their DVD player on their computer (can be Mac or PC or regular DVD player) and maybe show a coworker who could become a new patient...

Now, there are only three things that you need to keep in mind:

1. You must have good looking pictures to make this work well. If your images don't look great, it will be like showing a patient a filthy articulator covered in stone. At the least, you may want to consider buying our "Exceptional Clinical Photography DVD" found HERE.
2. For a few reasons, Apple stopped making iDVD this past year. Go and get a copy of iLife 11 and you'll be in great shape. That's where iDVD is found.
3. You must have a Mac to do this. Now, I love PCs as well, but there simply is NOT a program for PC that does what iDVD does as quickly and easily.

I hope this helps, and as always, you can email me with any questions or issues.

Take Care,
Glenn

Tuesday, April 10, 2012

The One Sentence That Makes All The Difference in Digital Case Presentation in Dentistry

A number of years ago, I had an amazing associate who worked with me. Talented, smart, funny and personable. A great diagnostician, this dentist was an overall excellent communicator. However, though every step in the digital case presentation workflow was followed, the new patients who saw this associate simply didn't schedule a lot of treatment. Worse yet, many of the patients came in for a new patient exam, never to return.

It was perplexing and a real "eye opener" for me. So, I investigated the system and tried to figure out exactly where the problem was. The images were gorgeous and the process worked of me, so why should there be a problem?

After interviewing some of the patients who never returned, I found out something very interesting.  They felt that the dentist was moral and just and that if a treatment plan was presented, it must be one that they felt very strongly about, so they would politely look for a second opinion, not wanting to offend the dentist or make them change their moral nature by "dumbing down" their proposed treatment plan.

Well, we learned from this and it was from that point on that I started every single case presentation with the same line that I teach attendees to my courses.  Before presenting any images or suggestions, I merely say "Now, remember, no matter what we discuss, I work for you, which means that if you don't like any of my suggestions, we're still friends and we can find another solution that does work for you."

The moment I started saying this to patients, you could see their tension disappear. Best of all, it was a natural extension of the entire Digital co-Diagnosis process, of which I am a strong advocate.

Start having this honest and fair discussion with your patients before presenting care and you should see amazing results.

Click here to see why everyone is raving about our "Exceptional Clinical Photography Made Easy" DVD and our revolutionary line of mirrors and retractors to capture the best images of your career.

Best Wishes,
Glenn

Please e-mail me at Glenn@KriegerContinuum.com

Thursday, March 22, 2012

How To Properly Store Dental Images On Your Computer

Before I get into this topic, I wanted to remind everyone that you can get regular updates on this blog by clicking the "follow" button in the upper left. Best of all, you can do so anonymously, meaning that you'll get regular updates, but no spam or e-mails from us. It's just a great way to keep getting updates related to clinical photography and digital case presentation.

Now, onto the topic at hand...

At every one of my courses, the first question I am invariably asked is "Which camera should I get?" followed quickly by "How should I store my images?".  The first question I answered in my previous post found either below this post or in the archives from last month (on right side of screen). The second one I'll answer below.

Sorry ahead of time to all of my orthodontists who subscribe to this blog. You folks (and myself hopefully in 30 months) are tethered specifically to your image management programs due to specific needs related to how you practice. The information below, however, would be great for you to use for personal image management at home.

When thinking of storing images, what are some of the features of the software I want to use? Let's run through a few. Ideally, the software would be:

              Free
              Stable
              Easy to Navigate
              Regularly Updated
              Supported by Customer Service
              Proven
              Part of a Stable Company
              Compatible from User to User
              Searchable
              
One last feature, not to be overlooked, is the ability to pull your images out at will and move them somewhere else. Why?

Imagine that you've bees storing your images using dental software "X" for the last 8 years. It's worked OK for you, but you're kind of getting upset with the way company "X" isn't doing regular updates to their software, and common nuisances are not being corrected. You decide you want to switch to dental software company "Z", only to find out that you cannot batch all of your images over to the new software. What that means is that your thousands of images are now stuck in "X" and would have to be brought over to software "Z" image by image, patient by patient. At last check, there is no guarantee from any dental software company anywhere that they can bring over every image from your old software and place the images in the correct file in the new software. So, if you make the switch to brand "Z", you either need to keep a copy running in the background all of the time on a separate computer, or you have to hire someone to go through every record, one by one, to bring over every image. I call that being held hostage, and there are better options out there.

So, if you're looking for a way to save images for free, with free updates in an easy to use, supported environment that has been proven for decades, is part of a company that will not be going out of business and can be used by virtually anyone on the planet, consider....Microsoft Windows Explorer. It comes FREE on every PC computer and is just sitting there ready to use!!!

Ask any programmer who works for Microsoft about Explorer's ability to save images and files and folders and they will gently correct you and tell you that it isn't about files and folders but rather "database management".  That's exactly what we want!!! A way to manage our database of images.

Using Explorer, we can create folders that make sense, duplicate them for special purposes such as showing our implant or veneer cases. We can search them quickly and we can alphabetize. Best of all, we can have this database stored on a computer other than our server so that it doesn't slow down the server if several users are searching it at once. Simply have your IT person (or yourself) create an icon for that folder on the desktop of any computer in the office and you guessed it...one click and it will open up anywhere in the office.

By right clicking the "Start" button, and left clicking "windows explorer", you'll unlock open one of the best tools we have for database management in dentistry. Best of all, it's FREE!!!


You'll get free updates and it has millions of users, so there are articles of every type on the web that can answer almost any question you can have. It's REALLY easy to use and once you switch to it, you'll wonder why you ever stored your images on your dental software. Plus, you'll have that liberating feeling of knowing that you can change to any dental software company you want, and your images will never have to be touched. That, to me, is priceless, which is why I make teaching it a vital part of all of my 2 Day Master's Class.

Wanna learn, hands-on, how to set up and manage a database of images for dental use? It's a key component of our 2 day Master's Class, along with hands-on clinical photography, image editing and digital case presentation.  Click Here to learn more and let us help you master the technical things to help your practice grow, so you can focus on doing dentistry. You can use code "Blog10" to get 10% off of any of our products or classes.

I'm here whenever you need me, so please e-mail me at Glenn@KriegerContinuum.com, though I look at (and answer) every comment left on this site.
             

Sunday, March 18, 2012

How to Buy a Camera, Flash & Lens for Clinical Dental Photography

Hi! If you're here, it means that you're trying to learn more about clinical photography and the equipment that goes with it. Kudos for taking the first step. Taking GREAT images (not just mediocre ones) is the first step towards changing your practice quality forever.

Clinical Photography
There's no reason to shoot a mediocre image (left) when you can quickly and easily learn how to get an awesome lateral image (right). Check out our DVD and get images like the right one for increased case acceptance and better documentation.

Also, please look to the right and notice our "Exceptional Clinical Photography Made Easy" DVD for purchase. We're proud that it has been acclaimed as being the best DVD for composition ever made and it's "sister" DVD "Getting Started With Clinical Photography" will be available soon. Don't fret, though, because the first DVD covers all of the tricks and tips to get exceptional composition every time. Click on the picture and use the code "Blog10" to get 10% off the DVD and any of our custom mirrors and retractors.

So, what camera equipment should I buy?

No matter where I go, or whatever group I speak to, this is by far the most common question I get. After all, what is a dental photography "expert" for if not to be a resource for the most up to date dental gear. So, I figured that this would be a great time to post my thoughts on current equipment.

Please keep in mind (or see my last post) about the fact that almost any equipment can be used to get great dental images. It just comes down to the question of how much work do you want to put into getting your images and how many steps do you want to take to get the kind of quality that facilitates increased case acceptance. After all, we MUST have increased case acceptance if we're going to do this, but more on this in future posts...

Also, keep in mind that if you're going to shoot an SLR (which are by far the easier cameras to use for dental photography once you know how) you MUST learn how to manipulate f-stops and flash settings (keep an eye out for our upcoming DVD "Getting Started With Clinical Photography" due out around 8/1/12), but as any of my students can tell you, those are two REALLY easy things to do once you're properly shown how. Though virtually no point and shoot will allow you to manually adjust f-stops or flash settings, the major differences in SLRs brands is the steps you need to take to change those things.

Now, for whatever reason, Canon definitely owns market share in dentistry. No matter what group I am speaking to, roughly 80% of dentists with SLRs seem to using Canons. That's OK. The only hurdle is that Nikon has always been ahead of Canon when it comes to the steps necessary to do what we need to do in dentistry. For instance, to change flash settings on the Nikon flash, one need only turn a dial one click and you're done. On Canon, you need to push the mode button, then select, then + or - an appropriate amount of times, then do it in reverse when you want to return to the original settings. For years, on Canon models, in order to see the histogram (the Almighty's gift to digital dental photographers) one needed to hit the play button, then info and wait for the tiny histogram, while at the same time Nikon models showed the histogram as an overlay that was full size. It was "little" things like this that always irked me with Canon. Are they great cameras? Definitely. Would I buy one for dentistry right now? No. Only because of what I just talked about. There's one more major reason...

Dental photographyNikon has the R1 flash (see right). Yes, it kind of looks like a Klingon bird of prey, but trust me on this. Learn how to effectively use this flash and your images will be exceptional. You see, the flashes are wide which gives you great shadows. Why do we like shadows? They give us ideal surface texture, embrasures and nuances of what we're shooting. Wanna destroy all of that? Use a ring flash. However, if you've learned how to use retractors and mirrors properly, this flash is a breeze to use. Like I said, switching from say a 1/4 flash setting to a full flash (for intraoral versus full face images) is a less than 1 second process. Plus, the flash is wireless, which gets rid of all of thos annoying cords. The angle of the flash is adjustable as well. I could go on and on about why a wireless flash could be useful from full face portraits to shooting lab work in a digital lightbox.

dental photography tips
Canon MT 24EX
Dental photography tips
Canon MR 14EX TTL (Double point, not ring)


Canon has two particular types of flashes that work great (see right) but they really aren't that close to the R1. They make a dual twin flash that looks like the R1 but has tons of buttons and wires and once set up, is far more complicated to use than the R1. They also have the traditional double point flash that works nicely, but again, a lot of buttons, and the flash is very close to the lens which means less shadows, which means less emphasis and highlights.  People think it's a ring flash, but it actually is a double point flash, however for some of our portraits, in order to get rid of annoying shadows, we need to turn off one flash. It's really easy with the R1, but with either of these flashes (or a Sigma equivalent) you'll be hitting so many buttons that you'll like a middle school girl texting her BFF. Of course, you could adapt the R1 to your Canon, but you would need the R1C1 which includes the commander module to make them fire, which increases the size and the price by $250. For that price, I'd stay with the conventional Canon choices.

Lenses

In this category, again, for dental use, Nikon comes out on top in terms of choices and versatility. As a side note, I never recommend using any "glass" (aka lens) other than what the manufacturer made. I have nothing against 3rd party lenses, but as dentists, we want as little muss and fuss when something goes wrong, and if my camera isn't working properly, I want to hand everything over to them and say "It's all your equipment. Fix it.".  We don't need the camera manufacturer blaming the lens and vice versa.

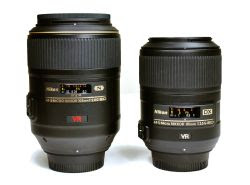
The old standby for Nikon was the Nikkor 105mm "micro" (only Nikkor uses the term "micro" instead of macro) and the new lens is beautiful, but it costs nearly $950 and is pretty heavy and wide. I'd suggest the 85mm lens which is way smaller, lighter and about $450 less!!! (See below)
dental photography
Nikkor 105mm vs 85mm "micro" lenses


The biggest complaint that most non-dental photographers have is that the lens is too light and feels flimsy, but I can tell you that lecturing all over the US every year and having to lug my "loaner" equipment for my courses, I have never encountered a problem with this lens and I can see no difference between it and the 105mm in terms of quality (see below).
dental photography
Nikkor 105 vs 85 on same patient (unretouched)

Unfortunately, Canon offers the standard 100mm lens which is of slightly lesser quality than the Nikon 105mm but you'll never know the difference. Canon does make a second 100mm lens for a price of about $1100 but we just don't need it for dentistry. The next smaller/lighter lens is the 60mm, but it does change where you have to stand when you shoot images for patients and may bring you a little closer to the patient than you want to be. Remember, you cannot use a lens from one manufacturer with another.

Cameras

Ok, here is the part you've been waiting for, right? By now, you know what you're locked into a flash and lens depending on the brand, so you have to choose. The price and features of both the Nikon and Canon are almost identical, regardless of which model you want. The only exception is the D90 by Nikon (if you can still find one). If one can still get the D90, which is no longer made, but is a great camera, you can get the lens, flash and body for less than $1900 and there is no comparable Canon setup at that price. If you can't get the D90, the next camera to get in the Nikon family is the D7000. There is no reason to go more expensive unless you like to waste money. It gives you nothing! Do not be tempted to go down to the D5100 either. It does not have commander mode for the R1, so to use the flash you must buy the R1C1 (like a Canon) and you just raised the price by $250.

Canon has some great cameras, but the best one right now is the 60D. It is more than enough camera to do anything you need. I would not suggest jumping up to the 70D when it comes out while the 60D is availale. Remember, we don't need many of the features that these cameras perform. All we need is a light, small camera body that can shoot aperture priority and take the lenses and flashes that we want. The Rebel T2i is a great camera and less expensive, lighter and smaller than a 60D. My only complaint is that the Rebel series (and the Nikon 5100) is and has always been a "consumer" camera. It's less expensive than "prosumer" cameras like the D90, D7000 and 60D which are made more rugged and are meant to last longer and take a bit more of a beating. The way I look at it, this is a commercial application, not a personal application, so why go with a consumer camera. If your budget absolutely doe NOT include a prosumer body, and you want Canon, then go with the Rebel series and maybe upgrade the body at some later date. The lens and flash will fit onto your future camera.

If you do not already own a dental camera but are considering buying one, I would encourage you to attend one of my courses where you'll get to try my loaner equipment before you buy, and at the same time, get personal instruction from me. If you can't make it to my course, at least consider my DVD for exceptional composition available HERE. Also remember that my specialized line of mirrors and retractors is available only through my website, and were developed by me after watching thousands of students use conventional mirror designs. I have been told that they make a huge difference and I would invite you to give them a shot. I offer "starter" sets of mirrors and retractors with and without the DVD, and they can be seen by clicking Here.

Well, I hope this helped. PLEASE, PLEASE, PLEASE REMEMBER: It's not about the camera.  Please see my previous post to understand why. In the end, you MUST get properly trained. Great images, used properly in the "digital co-diagnosed" process will help your communication go through the ceiling and help your case acceptance skyrocket, but it DOES NOT happen by accident.

Please e-mail me Here with any comments or feedback.

Best Wishes,
Glenn

Wednesday, March 14, 2012

It's not about the dental camera...


In his famous book "It's Not About The Bike", Lance Armstrong discussed many of the things that helped him become a champion. Unfortunately, many dentists place an undue amount of emphasis on the camera and dental equipment, when they should be worried about the quality of the image. In my humble opinion, they're way off base. Of course, having a proper camera, flash and lens makes a difference, but what is far more important is the composition of the image.

Composition is the makeup of the content of the image. In other words, how accurate of a representation of the real thing are our images. Almost every dentist needs to work on composition, but with great composition, almost any camera will work just fine.

Sure, a Nikon or a Canon may have certain inherent advantages for certain images, but in the end, taking the time getting trained on composition will pay rewards that will last a lifetime. A dark image can be lightened and a light image can be darkened, but a poorly composed image cannot be fixed. You can crop out unwanted information, but in order to get an accurate clinical representation, one should learn to master the art of retraction and mirror use.

To make a point, here is an image taken by me using a standard iPhone. No fancy lenses or lighting equipment.
Of course, it's out of focus, but that's because the iPhone does not have a macro lens-a lens to take an up close picture. However, take a look at the angle of the maxillary arch to the camera and the way the whole arch is seen evenly. This is a function of the mirrors and retractors and good patient positioning, not the camera you bought.

Below is an example of a poorly composed image. The lighting is great and the camera doesn't matter, however, look at the quality of the image. It doesn't properly represent the Angle's classification and we can see the "real" arch. There's simply a lot of extra information and the information that's supposed to be there isn't properly represented.

It's hard to see between the molars and if you notice, the emphasis of the image is on the cuspid, not the bicuspids or molars.

This image is really meant to show the posterior teeth, but the central theme here is not the posterior teeth.

If we could get rid of the "real" arch and just show the mirrored arch, set at 90 degrees to the mirror, we'd be way better off


Below is a much better lateral arch image that has just the information that we want to capture and again, the camera we used is unimportant. It's all about mirrors and retractors and this quality is possible for almost every single patient.

This is the kind of image that allows a patient to see and take ownership of their dental issues and it's the kind of image that allows case acceptance to go through the ceiling.

It just takes some time and instruction to get it right, and like Lance riding a bike, once you learn, you never forget.

Forget about the camera, get trained to capture amazing images and never stop trying to get the best images that you can.

Tuesday, November 8, 2011

Sorry for the break....

Hi Everyone.

First off, I am so very sorry for the time away. Yes, I know it's been a while, but I have been so focused, (no pun intended) on lecturing and coming up with new ideas that I simply let the blog go away.

I now have a new video blog at our redesigned website www.kriegercontinuum.com

I promise that I will do everything within my power to answer your questions in a timely fashion and help clear up a lot of the myths that are circulating today about clinical photography and its proper use.

Stay tuned and thanks for your patience. I'll make the wait worthwhile...

Glenn

Monday, December 31, 2007

New Mirrors Retractors are Finally Here!!!

Well, with some help of CAD/CAM, my new mirrors and retractors have finally gotten to a place where I think they work exceptionally well.  I have used them exclusively for the last several weeks and am thrilled with the results.  

So, what makes them different?

Well, I changed the widths a bit so that they are easier to see into by being slightly bigger, but I have also gotten rid of a lot of the "end" bulk, which makes them easier to fit into the mouth.

Additionally, I have made both sides and both ends of the lateral mirrors the same, so it's as if you have 4 of the same mirror for every one you buy. If an end gets scratched up, there are 3 other ends using both sides.

The maxillary and mandibular mirrors are also longer, so there's more places to put your hand without getting them in the way.

Of course, the unique retractors that I use have also been finished and I credit their shape and size to a lot of the detail that I capture in my images. I don't know how I ever practiced without them.

If you're interested in ordering them, please contact me through my website at www.betterdentalimages.com 

Have a great day!!!

Glenn