Facebook

Sunday, November 25, 2012

Which Dental Camera Should I Buy?

OK, so the title of this blog caught your attention and now you’re here to learn more about dental cameras. Well, I won’t let you down, but rather than simply give you the actual camera you should buy, I want to cover one of the most often overlooked aspects of dental camera purchases, flashes. They play a bigger role than you might think. I’ll cover camera updates another time.

One of the most common questions that I get is “Which flash should I use on my camera?” Well, the better question should be “Which camera should I use with my flash?” You see, the cameras are going to be pretty close in terms of what they can do for you, but the right flash can make all the difference.

First of all, you must have a macro flash. That means a flash specifically designed to work within a very close distance from the lens. Imagine using the “on board” flash for a close-up picture of a central incisor. You’ll be 6 inches from the tooth and the pop up flash will be about 6 inches from the patient’s eye. Not only will your patient be seeing red dots for days, but it will be impossible for you to light the mouth from that position. That’s a big part of why many point and shoot cameras are not appropriate for dental use. So, macro flashes are generally placed next to the lens so that they can light the oral cavity with ease.

Let’s start with flash brands. There are a lot of reasons to consider using a flash made by the same company as your camera, not the least of which is if anything goes wrong, you can take it to your Canon or Nikon repair center and they won’t blame the other company’s flash or camera. However, some flashes, like the Nikon R1, are specifically designed to work with special functions of their own camera system.

For instance, the R1 is a great flash. It’s a little wider than it’s predecessor, the SB-29S, but being farther to the side allows better shadows (think of shadows at 6 PM versus noon) which allows better surface texture and visualization of embrasure spaces. The R1, when used with the correct camera, is wireless, but only with Nikon Cameras that allow wireless function. So, if you bought a D3100 thinking you’d save some money, but never gave consideration as to whether you could ever use a wireless flash (which you can’t with the D3100), you’re out of luck. You could use the R1C1, which has a built-in commander unit, but you’ve just raised the cost of your flash by an additional $300 which incidentally is how much you saved by buying the D3100 rather than a better camera which is compatible with the R1.
The Nikon R1 Flash System for clinical photography is wireless and gives great adjustability.
There is a learning curve, but it’s well worth it.

The Nikon R1C1 can be used on all cameras that do not have wireless capability.
It’s expensive, so you may want to give thought to whether it’s worth it.
As far as macro flashes from Nikon go, the R1 is about all you get. You can add more speed light units to it, but it’s all the same.

If you like Canon, there are no wireless flash systems that compare to the R1. If you’re thinking of the Metz, don’t. Really...just don’t. I’ve used it extensively and for the price (or any other price) it’s not even close in quality or adjustability. Just don’t, OK?

However, the Canon MT24EX and MR14EX are great flashes, but very different. The 24 is amazingly strong. Like, REALLY strong. Which is great if you want to turn the f-stop way up, but having sat on the working end of it, I can tell you that it’s really hot too. For $750, I’d go with the Nikon R1 on my Canon and be wireless. The 14 is also a great flash and much easier (and more comfortable) to use, but the flashes are directly next to the lens and like I said earlier, you will see a bit more “washing out” of detail, plus, if you’re ever inclined to use a bounce flash like the ones made from Lumiquest (I’ll post on this another time) you’re out of luck. They can attach to the 24, though.
The Canon MT24EX is a GREAT flash but simply may be more than most dentists want or need.
The MR14EX is a great option for Canon users but it does have some limitations.


Like I said, if a great, easy to use wireless flash, which can take bouncers matters to you, then don’t buy a Canon camera, and make sure that the Nikon you buy has wireless commander capability. If, however, you’re happy with the idea of the MT24EX or the MR14EX, then go for a Canon.

Oh, if you want to bring the Sigma EM 140 flash into the discussion, it’s essentially the same thing as 14EX (just much bigger), and I see no good reason to go away from a Canon product for essentially the same product, though many will be lured there for a $150 savings. I’m not making light of the savings (no pun intended) but I have used both and think the Canon is a better product.


The Sigma is a cheaper and bigger alternative to the MR14EX.
I’ll tackle lenses next.

Best Wishes,
Glenn

Sunday, October 28, 2012

Background Color For Portraits

One of the most common questions I get is: What do I use for backgrounds when I’m taking full face portraits?

Well, the first thing to think about is the texture of the background. Texture? Yes, it is super important. If you have a wall painted with semi-gloss or gloss, your images will look terrible regardless of the color. If you have distracting texture like wallpaper, regardless of color, it won’t look good. Consider eggshell as a paint finish. It works great.

Just as an aside, for almost all orthodontic offices, a synched backlight is used. It eliminates shadows, and though very clinical and not very pretty, it is the standard in ortho.

For everyone else, we’ve got to think of a color. Too light washes out the patient and too dark may blend in with the skin color of some patients, as well as dark hair. Traditionally, dentists have liked neutral colors like taupe, and that’s what I’ve used for years, but I am no longer a fan.  They tend to wash out the patient’s color.
Taupe Dental Photography Background
It’s very unflattering and washes out the patient’s complexion
Avoid whenever possible

Other doctors like blue, but I find it too distracting and the coolness tends to take away from the patient. Plus, in my humble opinion, it’s very dated. Think circa 1997.

I switched to a dark burnt orange about 4 years ago and it made a huge difference in my images. No matter the patient’s skin color, it contrasts very nicely and the warmth is nice for the overall image.

Burnt orange flatters all skin and hair colors
Give it a try. You’ll love the way your images look

One last point.  Simply paint a wall the right color. Don’t try to use poster board and hang it behind the patient. I’m a fan of less work and invariably the stored poster board gets screwed up somehow. However, you can have a background on a roller like they do in professional photography studios and it can work very nicely.

Great backgrounds make for great portraits and that can help you market your practice with some of your beautiful final results.

Best Wishes,
Glenn

Saturday, September 8, 2012

Welcome Back All!!!

Hi everyone.

I hope that you had a great summer.

Well, it’s been a long couple of months and I apologize for my absence. You see, I started as a full time student at an orthodontic residency, and after 20 years as a restorative dentist, there were obviously a lot of changes in my life.

I apologize for not having the time for posts over the last couple of months, and I hope I am forgiven.

Now that Autumn is upon us, you should start seeing some more fun posts.

Please contact me at glenn@kriegercontinuum.com if there are any subjects you’d like to see me cover.

Best Wishes,
Glenn

Saturday, June 23, 2012

How Are YOU Evaluating Your Dental Photography??

Hi All.

I just finished my move to South Florida and life has been crazy, but it has allowed me the time to sit and think for a while about the whole "digital photography" thing. You see, there are a ton of reasons to take great images and having taught for so many years has allowed me to interact with many of you and learn a bit more about why you go through the effort and energy of getting exceptional images.

Whether it's an anterior esthetic image or a picture of a lateral arch for purely functional reasons, taking a great image is the goal whenever we pick up the camera, however, there is great debate over almost every aspect of digital dental photography.

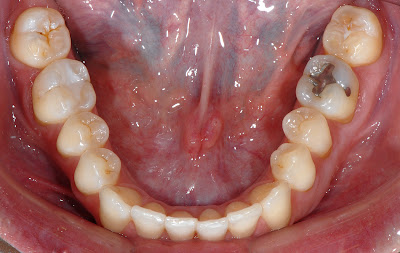
There is even great debate over what makes a "great" image. Is it the composition, the subject matter, the pose, the esthetics of it, the clinical value or perhaps even the marketability of the particular image? My answer: I don't think that any one person can define what makes a great image. It's like art. It's subjective. However, for specific shots, there are objective criteria by which we can judge them. For instance, if we were to look at a mandibular arch image, we would want agree that there are certain things that make it "exceptional". They could include:

Arch centered
Entire arch visible
Looking straight down on the arch
Tongue not covering occlusal surface
Dry arch
Lower lip out of the way
Only the mirror image visible (not other teeth)

Of course, there are many other criteria we could add, but these are several that would be relatively non negotiable among most dentists. The question is, when we take a mandibular image, do we keep all of these ties in mind when we shoot the image? Are we actually sitting down and evaluating our images using these criteria? Do we "score" ourselves so that we can get better images next time? If our assistants are shooting images, do we ever sit down and grade their work? Try something on Monday. Take a single image and list all of the criteria by which the image should be graded. Grade each of your criteria based on a point value (ex: 1-10) but list what you consider to be a "passing" and "exceptional" score before you grade.

Of course, there's a bit of subjectivity here, but in the end, if you mark a 6 instead of a 7 or 8 on a criteria or two, it isn't going to destroy the value of everything.

Here's a random example from my library of images. Assuming we give a 1-10 (10 being best) for the aforementioned criteria, let's grade it.

Dental Photography Tips


Arch centered                                                  10 I don't think I could have improved it
Entire arch visible                                             8 I would like to see the retromolar pads
Looking straight down on the arch                   9 Ever so slightly tilted backwards and not straight on
Tongue not covering occlusal surface              10 Not even close to being in the way
Dry arch                                                            9 Pretty dry, but I could have done better
Lower lip out of the way                                   5 Not done very well
Only the mirror image visible (not other teeth) 10

Total Score:                                                 61/70=87% B+
Not bad, but I can definitely improve

I know it takes time, but it's one of the few ways to get better. Try it randomly from time to time and see how you do. You may find that certain issues (like having the arch centered) are things that you do really well and other things (like lip out of the way) may be more challenging.

Only by objectively evaluating your images can you figure out where you need work and do that. Your images are sure to get way better.

Best Wishes,
Glenn


Friday, May 25, 2012

How to Get AWESOME Lab Images

It's been said that "Good is the enemy of great." When you have something that's good enough, where's the motivation to get something great?

Well, I'm just a GP (about to start an ortho residency for 30 months), so who am I to talk about lab shots? Well, as someone who teaches clinical photography around the world, it's my job to look into every aspect of the subject. I've been using a great product for about 7 years and I'm happy to share it.

dental photography lab photo
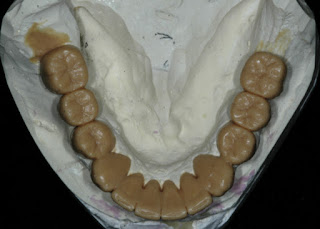
We can now make lab images look way better than this traditional image


When you want to show images of casts or lab work, how do you shoot them? There are lots of ways to capture an image, and there's a progression that most people go through.

Maybe you simply put the object on the counter with a nice formica background. Not very pretty or fancy, but the job gets done. Perhaps you go so far as to put a nice bib underneath it instead. Not my favorite, but at least the funky formica design doesn't distract those viewing the image.  If you start to get "fancy" perhaps you decided to put down a piece of black velvet and you may have even gone one step farther and shot an image of the lab work on a mirror like one of those big shot lecturers.

Well, if you're looking to get great lab images and I mean GREAT, you have to consider using the Digital Lighthouse found at Photekusa.com. Yes, it means having one more step, but when you see the difference it makes, you'll understand why you used it. They come in a variety of sizes, and even the largest is only $149.

dental photography tip photo
The digital lighthouse helps give stunning lab images, especially if the object being photographed is metallic or translucent.

The concept is simple. Like a standard soft box used in portrait photography (see image below) using the digital lighthouse removes all glare from flashes.
dental photography tools photo
The digital lighthouse works a lot like this standard soft box by removing glare and shadows and giving a much softer look to the object being photographed.

The only pre-requisite is that your flash must be positioned outside of the white nylon box so that it can be softened. This is where I really love the Nikon R1 (or R1C1) because the two small sb-200 units can be taken off the camera and held outside of the box. If you shoot a Canon 14EX (or Sigma equivalent) you're only going to get light from one direction rather than two and you may consider another flash system for lab work. Photek sells two nice lamps that could take the place of the flashes altogether and you could have the whole setup ready to go at all times.

If you want to skip using flashes altogether, consider buying Photek's lamps.


In another blog post I'll show you exactly how to shoot an image using the flash option. The whole purpose of this post is to show you another way of looking at things. For instance, take a look at the following image taken with a regular flash setup without the digital lighthouse. It was taken a number of years ago and to make it fancier at the time, I used a piece of black velvet background.

dental camera photo tip
Notice the shadows all around the outside of the cast and more importantly, look at the glare coming off the metal pieces of the implant parts. Yes, the image is "acceptable" but we can do much, much better.

Look at the image of the wax up below. Yes, it is well lit and composed properly and it even has a nice velvet background, but it just doesn't "pop".

dental camera tool


Now, look at the following image of a soft tissue cast. With the addition of a nice Photoshop colored background (I always try to disclose non-global changes) you have what I think is an image that is way better.

dental photography camera

Or, take a look at this whitening whitening tray. It's really, really tough to shoot anything translucent because of glare and difficulty getting good depth. The lighthouse tackles that with ease.

cliniIcal dental photography
Using the lighthouse and photoshop for some dust removal on the black background and a very tough to shoot translucent object turns out pretty nice.

Take a look at this hybrid prosthesis...
dental camera


OK, this last image wasn't taken in a lighthouse. It was actually taken on a mirror using the R2 bracket and pocket bouncers, but that's for another blog... ;)

Remember, if you want to get amazing intraoral images, consider ordering my "Exceptional Dental Images Made Easy DVD" or my custom designed mirrors and retractors by clicking HERE.

Also, if you have any questions or want to see me tackle a particular topic, just click HERE and send me an e-mail through my website.

Best Wishes,
Glenn

Thursday, May 17, 2012

The Upcoming New Mac, Windows 8 and Dentistry: Your Images Had Better Be Great!

Apple is coming out with some pretty big changes to their computers  and new Mountain Lion OS and Windows is coming out with its' radical new OS Windows 8. So, the big question has been, should we wait or buy now? And, if the rumors about the new Mac screen are true, you better start thinking a lot more about shooting images that look awesome WITHOUT being cropped.


dental photography cameradental photography


The rumors are swirling and as we get closer there are more and more comments coming out. Just look at the recent online article which covers some of why you may want to wait. Click HERE to view it.

dental photography camera
Just one view of what Windows 8 desktop will look like


In the end, there is a really interesting article about the new Mac screen which poses some interesting possibilities for dentists. You have to see it. Click HERE.

Currently, a screen with a resolution of 1900x1200 is pretty good (2.28 Megapixels) but the possibilities of the new 17" macbook with a 3840x2400 (9.2 Megapixels) screen is simply mind boggling!!!! If this is true, we're about to see a paradigm shift in both the way we shoot and view images very, very soon.

If you're shooting an older camera, it is possible that you may not even have enough pixels to fill the screen. Of even more concern, if you rely on cropping your images to make them look nice, you also may not have enough pixels to fill the screen regardless of the camera you use.

Plus, your images had better be looking good. If you want better resolution (which you should), every little thing will be seen by you AND your patient. So, if your images aren't clear or poorly composed, they will look worse.

That is why, more than ever, it's important that you shoot amazing images with zero need for cropping. As technology increases, it will become more and more important.

To learn more about the acclaimed DVD that is helping dentists shoot the best images of their career, click HERE and change your practice forever.

Stay Tuned!!!

Wednesday, May 2, 2012

A New Flash Gives Great Dental Portraits Super Fast & Easier Than Ever

In the early 1970's, when I "borrowed" my dad's Minolta FT QL (released in 1966) and decided at age 6 that I loved photography, I had no idea that my hobby would evolve into this. Sure, like every photo geek I had my own B & W darkroom where I would enlarge images, always finding a huge clump of dust somewhere on the enlargement. It was my version of "Where's Waldo" but I kept on going with it and never imagined that one day people would hire me to come and teach them how to get great dental images. I blame it on my dad (both a photo hobbyist and dentist) but even with all of the photo toys that he had, I don't think that we could have imagined the actual functionality of many of the innovations available to the average person today.

I remember the days of setting up a couple of light boxes or umbrellas along with the use of a light meter and an array of equipment to capture really nice portraits. Worse yet, you needed a decent ceiling height to get good images and a lot of room to set the equipment up for different "moods". We still can do that today, but for the average dentist who simply doesn't have the budget or room to create a true studio, I introduce the Stellar Diva 18 inch CFL ring light.

dental camera
The 18" CFL bulb is bright but very cool and comfortable to be near.


What is it, you ask? It's a simplified way to take portraits. The concept is this: Set the light (less than $200) on a tripod or stable base, attach your camera on a flexible stalk (included) and you have perfect lighting. No softlights, no heat, no extra room (or budget) needed. Seriously. Just set it up, seat your subject in front and shoot.

Well, I took it over to a friend's office today to show it to him and we started shooting images. I chose to do things a little differently than they suggest and shot using an old Nikkor 70-300 lens from above , rather than attach the camera to the stalk. You don't need to do this, but I've always enjoyed thinking "outside the box", plus, I love the blurred background I can get using both a low f-stop and the zoom. I guess it's just my style.

Below are a few images and as anyone there can attest, once I set it up, it took literally less than 5 minutes to shoot all of the images you see below.  Are they as good as a $2000 setup with 3 lights? You be the judge, but remember, how good is good enough? With this system, I don't need extra room, it can be set up in the operatory in literally 1 minute and I'd feel fine putting these images up on my wall any day.

Remember, other than slight histogram adjustment and maybe a tiny bit of sharpening, there were no other changes to these images. There was no makeup or hairstyling and I just wanted to see what things would look like in an "average" setting. Scroll to the end of the 5th image and you'll see one more capability of this equipment...

Dental camera
dental photography tips
dental photography
dental photography
dental camera
Do you know how hard it is to make your 12 year old daughter smile for dental portraits?!?!?


So, using the light on an angle to the smile, I wanted to see what things could look like without diffusers or bounce. Just the ring light and an oblique angle. I had never tried this before, but the possibilities are endless.

dental camera
This is just the ring light and my camera and nothing else. 

dental photography
Just having fun with an "artsy" anterior shot, but it can do so, so much more.

Only one piece of equipment, for less than $200 to get great portraits and up close shots? I'll be using this a whole lot more...